SoulX Podcast-1.7B
Deploy SoulX Podcast-1.7B on a Spheron GPU instance. SoulX Podcast-1.7B is a 1.7B parameter speech generation model that produces multi-speaker podcast dialogues with speaker switching, zero-shot voice cloning, and paralinguistic elements such as laughter and sighs. It supports English, Mandarin, and several Chinese dialects.
Key capabilities
- Multi-speaker dialogue: Maintains consistency across turns and handles interruptions
- Zero-shot voice cloning: Replicates voices from 10 to 30 second reference samples
- Paralinguistics: Generates laughter, sighs, throat clearing, and intonation shifts
- Multi-language: Supports English, Mandarin, Sichuanese, Henanese, and Cantonese
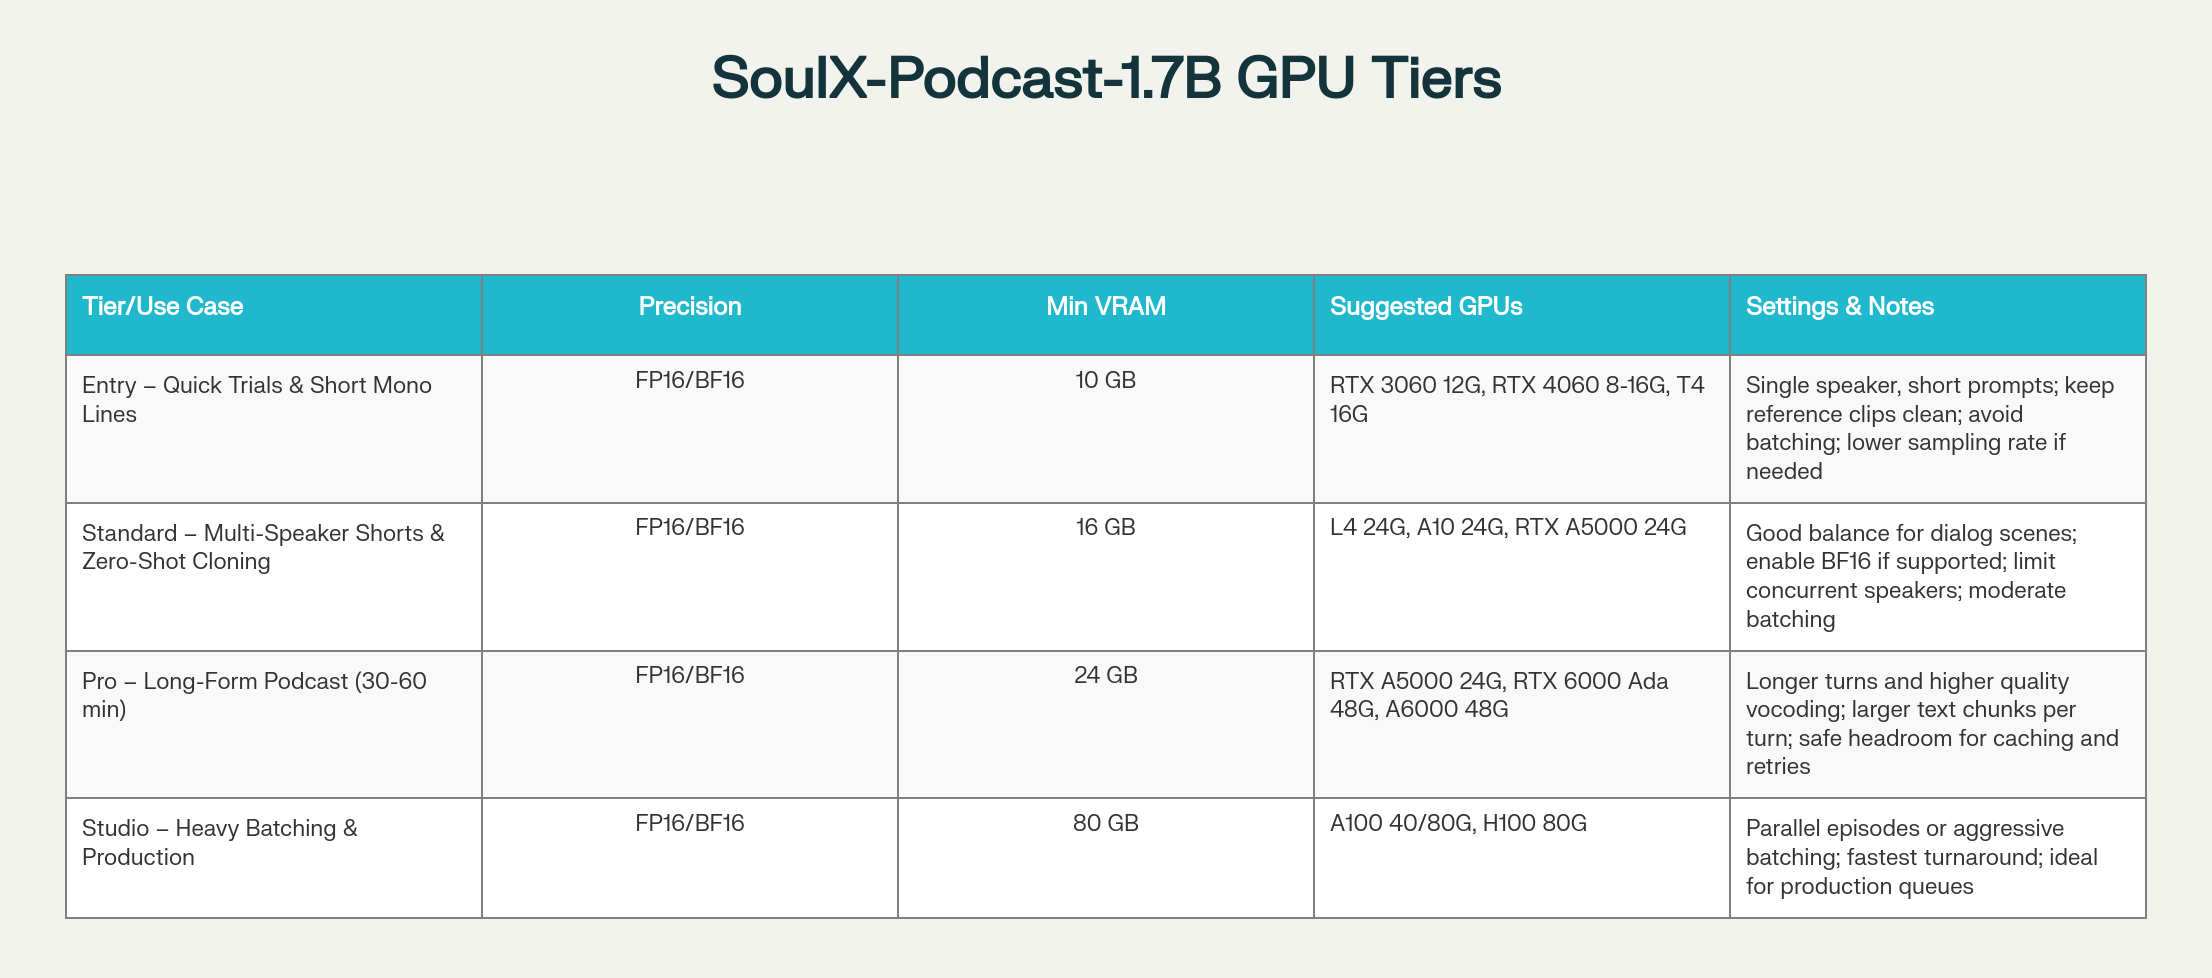
- Efficient deployment: Runs on GPUs ranging from RTX 4060 to H100
Manual setup
Use these steps to set up the server manually after SSH-ing into your instance. This works on any provider regardless of cloud-init support.
Step 1: Provision a Spheron instance
- Sign up at app.spheron.ai
- Add credits (card/stables)
- Click Deploy → RTX 4090 (or RTX 4060+ for testing) → Region → Ubuntu 22.04 → add your SSH key → Deploy
See Getting Started or SSH Connection for details.
Step 2: Connect to your instance
ssh <user>@<ipAddress>Replace <user> with the username shown in the instance details panel (e.g., root or ubuntu) and <ipAddress> with your instance's public IP.
Step 3: Set up the environment
sudo apt update && apt install -y software-properties-common curl ca-certificates
sudo add-apt-repository -y ppa:deadsnakes/ppa
sudo apt updateStep 4: Install Python 3.11
sudo apt install -y python3.11 python3.11-venv python3.11-dev
python3.11 -m ensurepip --upgrade
python3.11 -m pip install --upgrade pip setuptools wheelStep 5: Install Miniconda
curl -O https://repo.anaconda.com/miniconda/Miniconda3-latest-Linux-x86_64.sh
bash Miniconda3-latest-Linux-x86_64.sh -b -p $HOME/miniconda3
$HOME/miniconda3/bin/conda init bash
source ~/.bashrcStep 6: Create conda environment
conda create -n soulxpodcast -y python=3.11Accept ToS if prompted:
conda tos accept --override-channels --channel https://repo.anaconda.com/pkgs/main
conda tos accept --override-channels --channel https://repo.anaconda.com/pkgs/rStep 7: Activate environment
conda activate soulxpodcastStep 8: Clone the repository
git clone https://github.com/Soul-AILab/SoulX-Podcast.git
cd SoulX-PodcastStep 9: Install dependencies
pip install -r requirements.txt
pip install --index-url https://download.pytorch.org/whl/cu121 torch torchvision torchaudio
pip install "transformers==4.57.1" "huggingface_hub<1.0,>=0.34.0"Download models
Base model (English/Mandarin)
huggingface-cli download --resume-download Soul-AILab/SoulX-Podcast-1.7B \
--local-dir pretrained_models/SoulX-Podcast-1.7BDialect model (Sichuanese/Henanese/Cantonese)
huggingface-cli download --resume-download Soul-AILab/SoulX-Podcast-1.7B-dialect \
--local-dir pretrained_models/SoulX-Podcast-1.7B-dialectTest the model
bash example/infer_dialogue.shCheck outputs/ directory for generated .wav files.
Launch the WebUI
Modify webui.py
Change share=False to share=True:
# In webui.py:
share=TrueStart the WebUI
Base model:
python3 webui.py --model_path pretrained_models/SoulX-Podcast-1.7BDialect model:
python3 webui.py --model_path pretrained_models/SoulX-Podcast-1.7B-dialectOpen the Gradio link printed in the terminal (e.g., https://baccd06ba693323c35.gradio.live) to access the interface.
Troubleshooting
Issue: Low audio quality
Set a higher sample rate:
python3 webui.py --model_path pretrained_models/SoulX-Podcast-1.7B --sample_rate 48000Issue: Out-of-memory (OOM) error
Increase the CUDA memory split size:
export PYTORCH_CUDA_ALLOC_CONF=max_split_size_mb:512Issue: Model download failures
Set a custom cache directory and retry the download:
export HF_HOME=/path/to/cache
huggingface-cli download --resume-download Soul-AILab/SoulX-Podcast-1.7BIssue: CUDA errors
Verify CUDA availability, check GPU status, and reinstall PyTorch if needed:
python -c "import torch; print(torch.cuda.is_available())"
nvidia-smi
pip install --index-url https://download.pytorch.org/whl/cu121 torch torchvision torchaudioIssue: Gradio interface not accessible
Ensure share=True is set in webui.py, then allow the port through the firewall or specify an alternate port:
sudo ufw allow 7860/tcp
python3 webui.py --model_path pretrained_models/SoulX-Podcast-1.7B --server_port 8080Cloud-init startup script (optional)
If your provider supports cloud-init, you can paste this into the Startup Script field when deploying to automate the environment setup. After the instance is ready, SSH in, activate the conda environment, and follow the Download Models and Launch WebUI steps.
#cloud-config
runcmd:
- apt update && apt install -y software-properties-common curl ca-certificates git
- add-apt-repository -y ppa:deadsnakes/ppa
- apt update
- apt install -y python3.11 python3.11-venv python3.11-dev
- curl -fsSL -o /tmp/miniconda.sh https://repo.anaconda.com/miniconda/Miniconda3-latest-Linux-x86_64.sh
- bash /tmp/miniconda.sh -b -p /opt/miniconda3
- /opt/miniconda3/bin/conda create -n soulxpodcast -y python=3.11
- /opt/miniconda3/bin/conda run -n soulxpodcast pip install --index-url https://download.pytorch.org/whl/cu121 torch torchvision torchaudio
- git clone https://github.com/Soul-AILab/SoulX-Podcast.git /opt/SoulX-Podcast
- /opt/miniconda3/bin/conda run -n soulxpodcast pip install -r /opt/SoulX-Podcast/requirements.txt
- /opt/miniconda3/bin/conda run -n soulxpodcast pip install "transformers==4.57.1" "huggingface_hub<1.0,>=0.34.0"After cloud-init completes, SSH in and download the model:
source /opt/miniconda3/bin/activate soulxpodcast
cd /opt/SoulX-Podcast
huggingface-cli download --resume-download Soul-AILab/SoulX-Podcast-1.7B \
--local-dir pretrained_models/SoulX-Podcast-1.7B
python3 webui.py --model_path pretrained_models/SoulX-Podcast-1.7BWhat's next
- Specialized Models: Compare SoulX Podcast with Chandra OCR and Janus CoderV
- Instance Types: Select the right GPU tier for audio generation workloads
- Getting Started: Create a Spheron account and deploy your first instance
- SSH Connection: Connect to your instance after deployment