Billing
Manage credits, monitor usage, and track spending for GPU instances.
Credit system
How it works:- 1 Credit = $1 USD of GPU usage
- Credits never expire
- Credits are shared across team members
- Pay-per-second billing: credits are deducted continuously based on your hourly rate, so you pay only for the exact time your instance runs
- Minimum deposit: $15
- Instant credit delivery
Dashboard overview
The Overview section shows your balance and live GPU usage at a glance.

- Available Balance: Credits ready to spend on GPU deployments. An account-status indicator (for example, "Account in good standing") sits below the value.
- Total Spent: All-time GPU and storage spend for the team.
- Active: Number of GPU instances currently running.
- Burn Rate: Current hourly cost across all running instances.
- Est. Runtime: Estimated time remaining at the current burn rate. Shows N/A when there is no active spending.
Adding credits
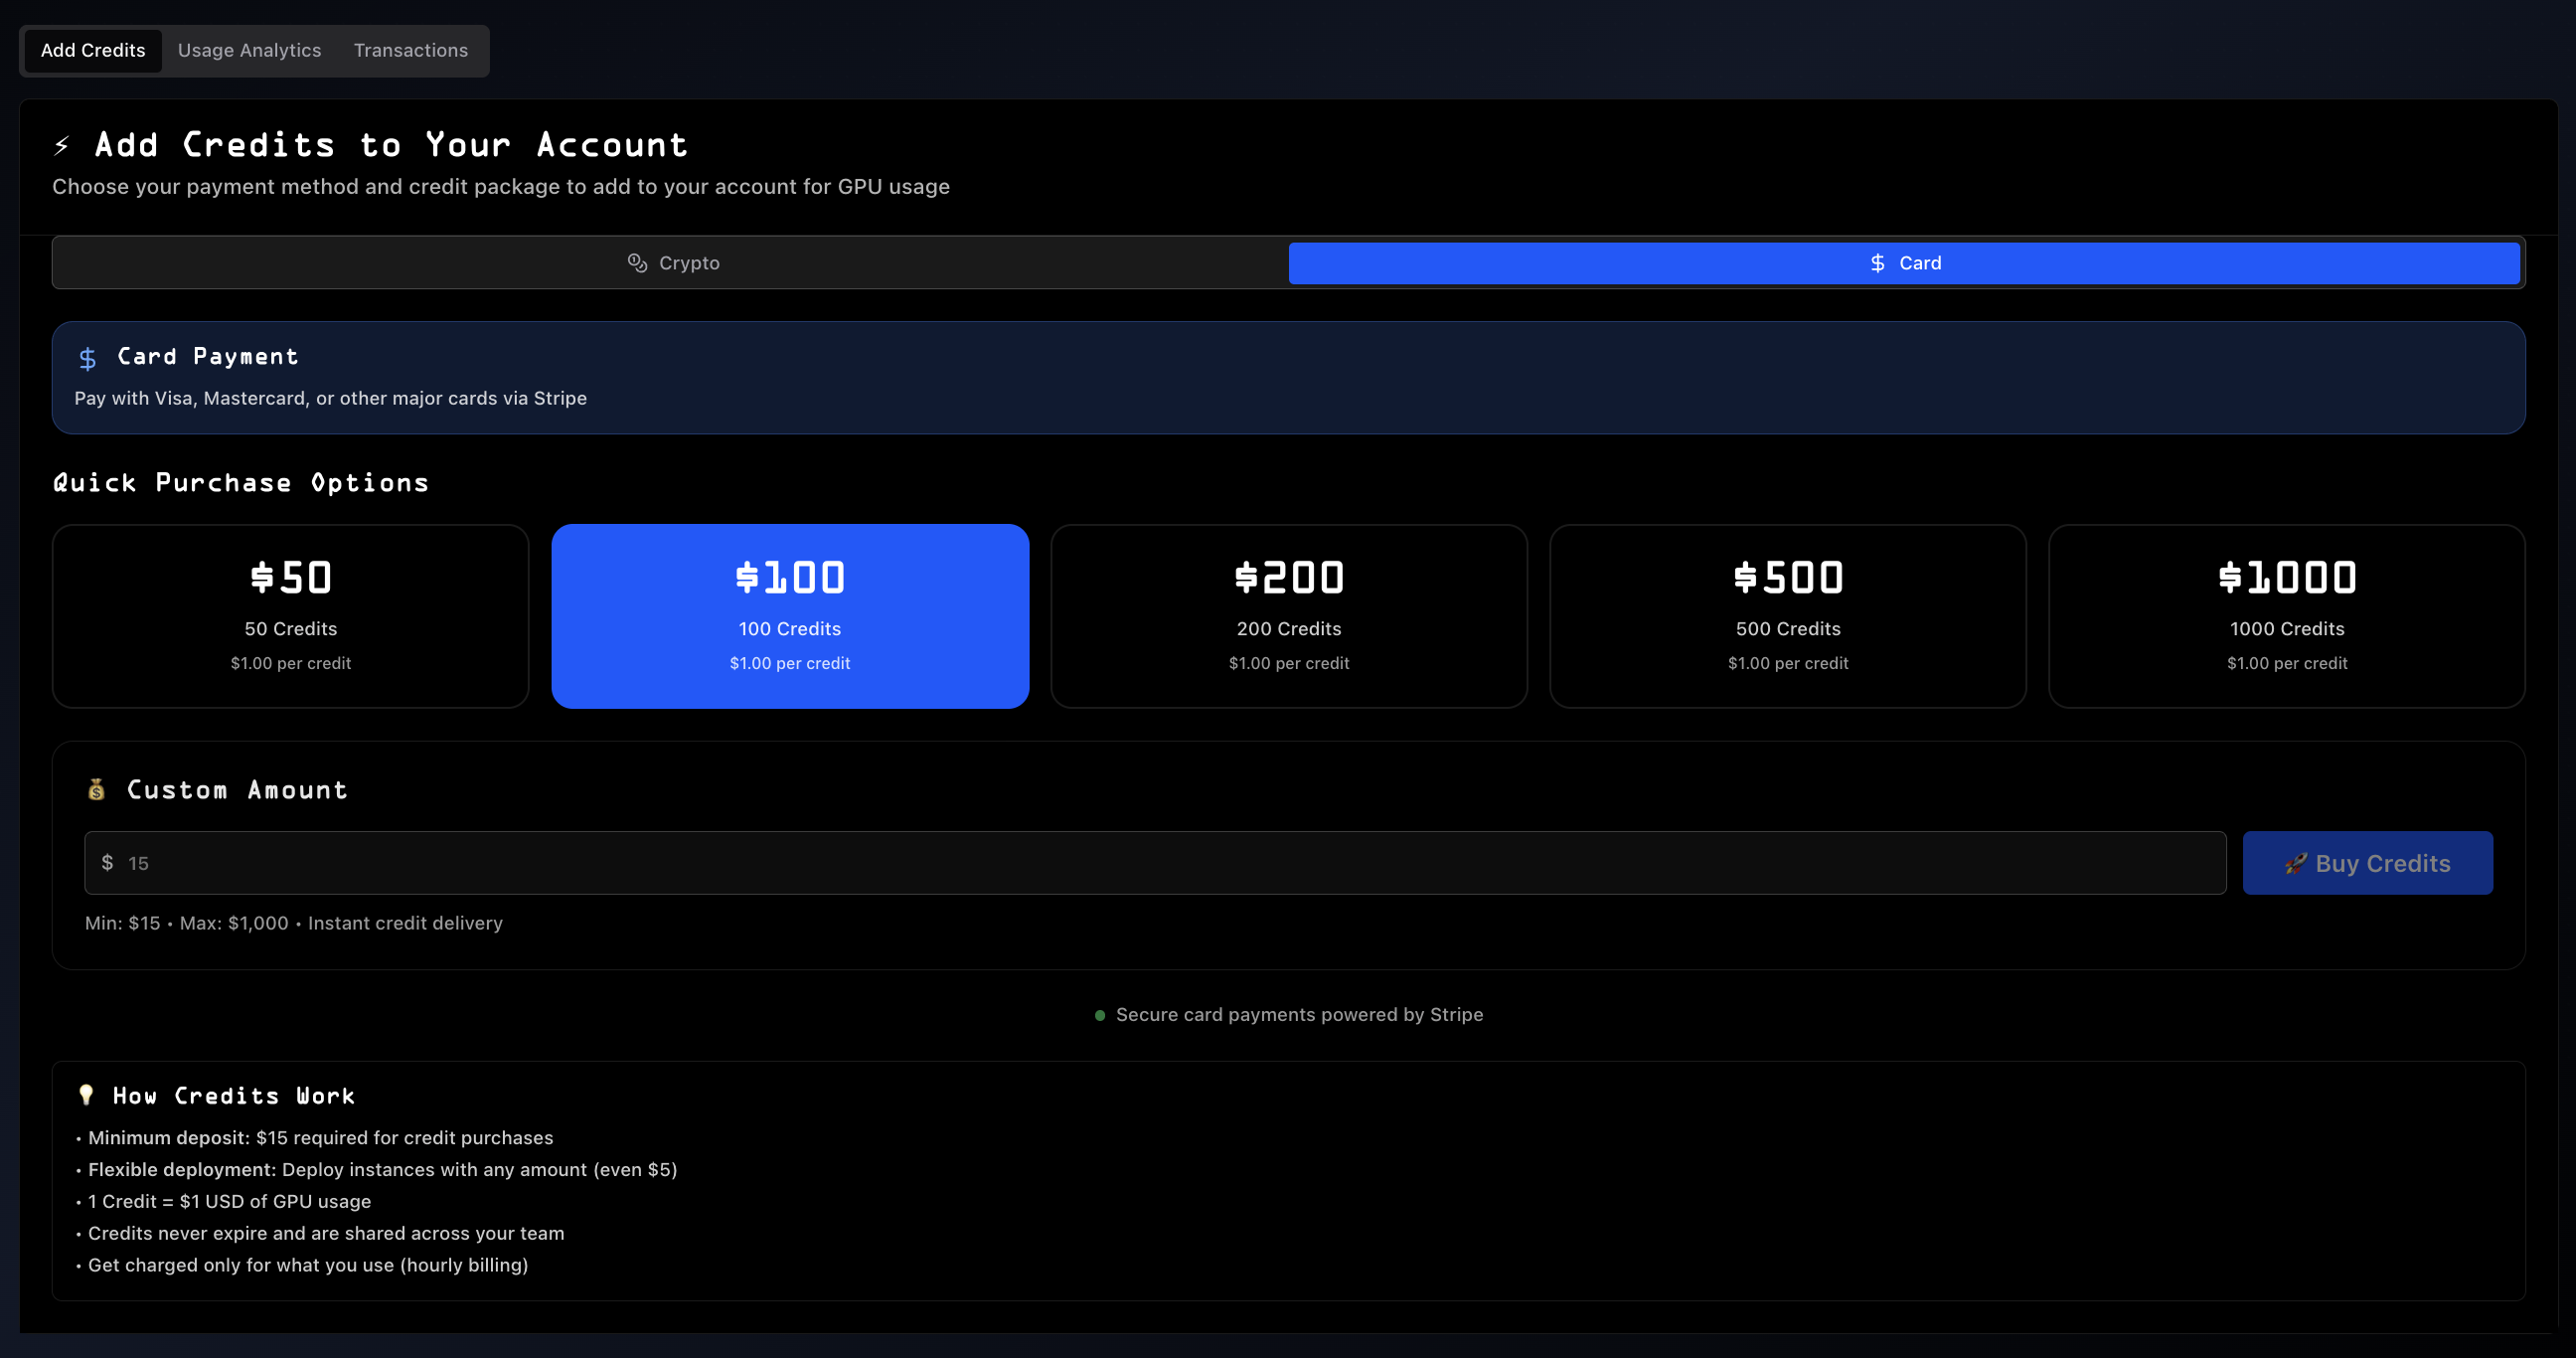
Payment methods
Card payment (powered by Stripe)
- Visa, Mastercard, and major cards accepted
- Secure processing via Stripe
- Instant delivery
Stables payment (powered by CopperX)
- USDC and USDT accepted
- Blockchain-secured transactions
- Instant delivery
Preset packages
| Amount | Credits | Rate |
|---|---|---|
| $100 | 100 | $1.00 / credit (Popular) |
| $1,000 | 1,000 | $1.00 / credit |
| $5,000 | 5,000 | $1.00 / credit |
Custom amount
Enter any amount between $15 (minimum) and $5,000 (maximum) for instant delivery.
Usage analytics
Track deployments, GPU spend, and volume costs in one place.
A time-range selector at the top of the panel (default: All Time) filters every metric and the deployment list below.
Summary metrics:- Deployments: Total deployments in the selected range
- GPU Spend: GPU compute spend in the selected range (also shows the billed-instance count)
- Active Volumes: Currently active persistent volumes (also shows the total volumes ever created)
- Volume Cost: Accumulated storage spend in the selected range
- GPU model, count, VRAM, and hourly rate (for example,
1x L40S PCIe - 48GB GDDR6 - $1.07/hr) - Instance ID
- Provider and region
- Duration and timestamp
- Total cost and status (active or terminated)
Use the analytics view for:
- Cost analysis by GPU type
- Spending pattern review across time ranges
- Project cost tracking
- Usage optimization
Deposit history
View all credit deposits and top-ups for your team.
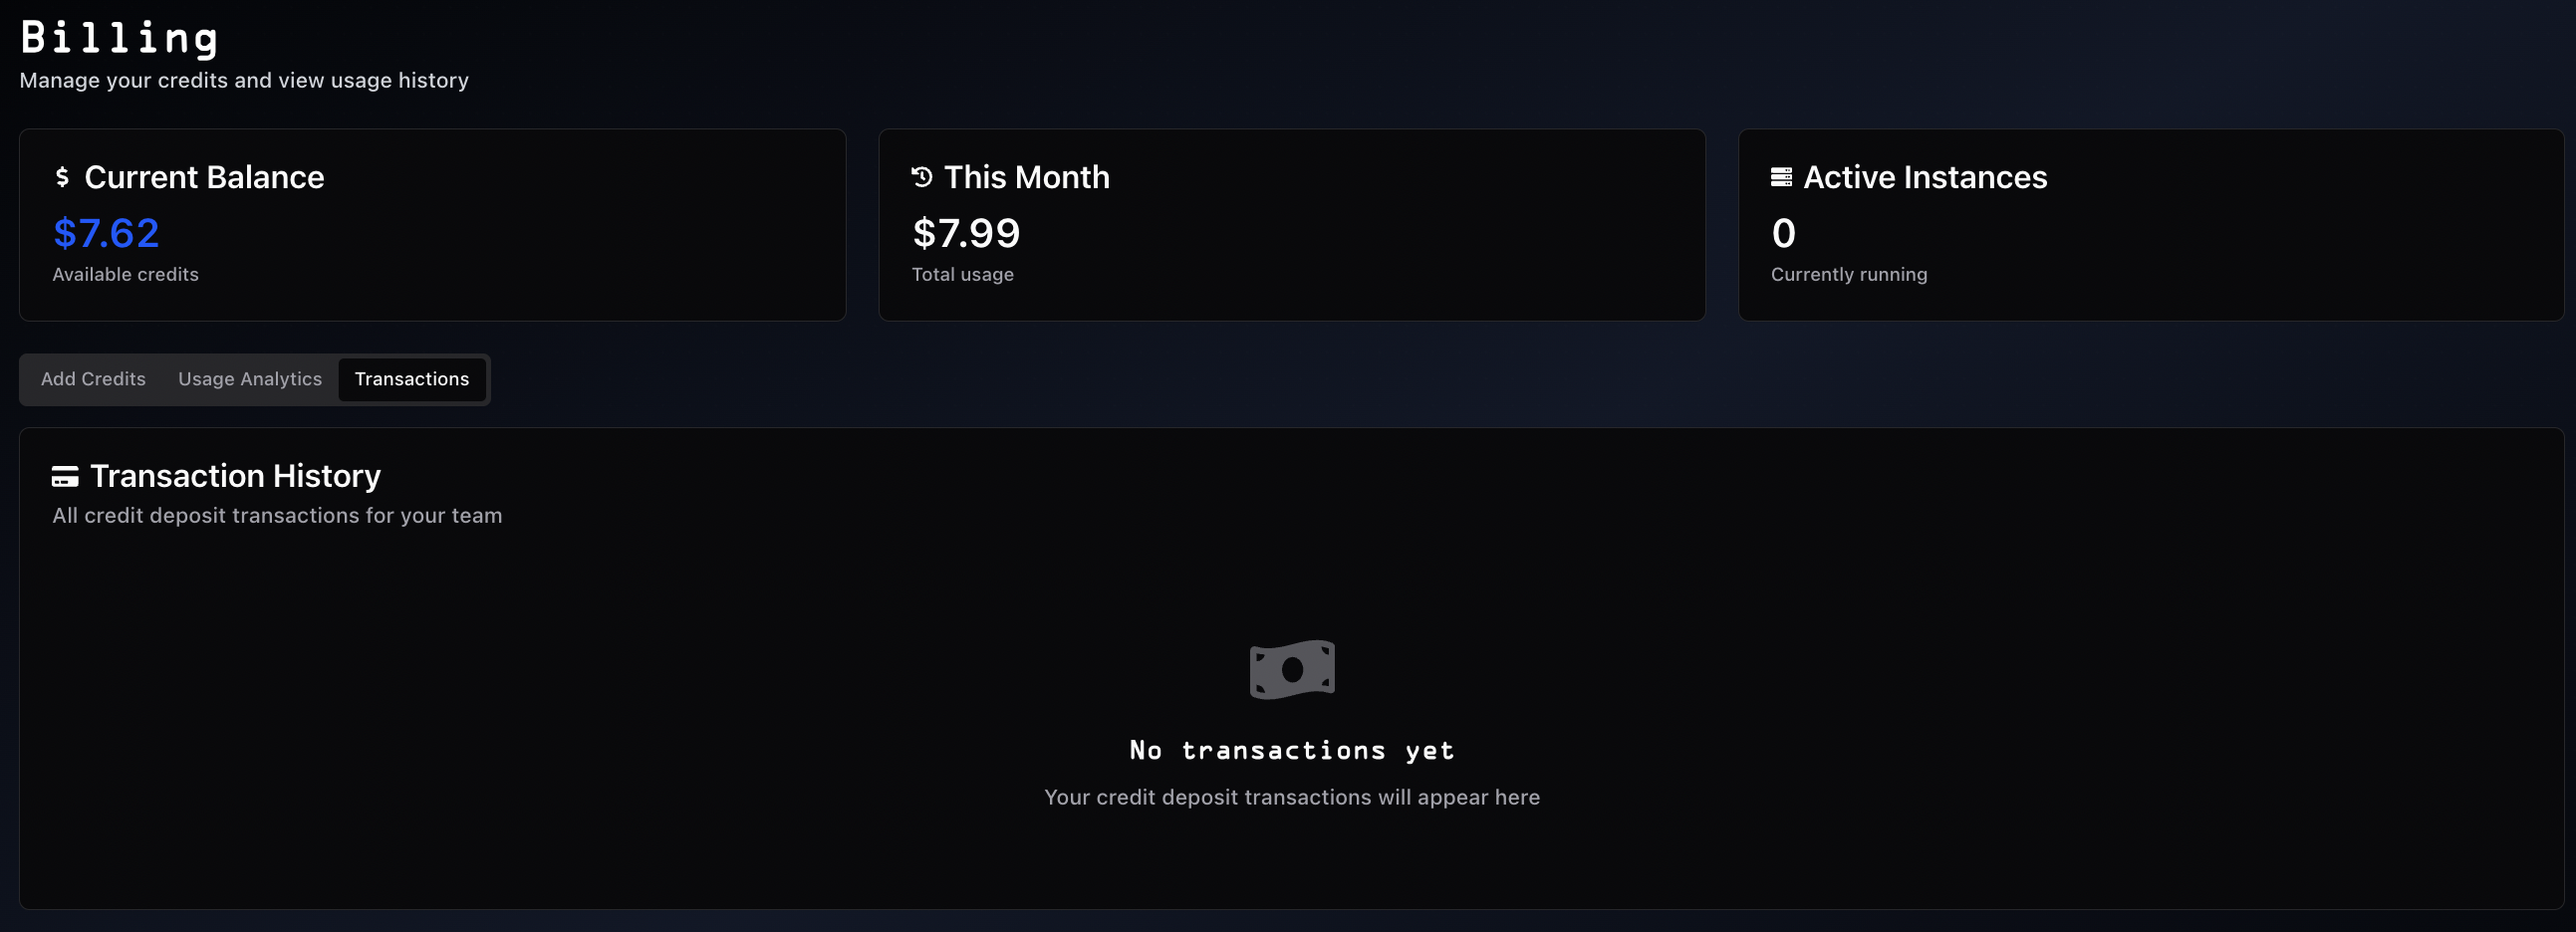
A time-range selector at the top (default: All Time) filters the summary metrics and the deposit list.
Summary metrics:- Total Deposited: All-time deposit amount across the team
- Avg Deposit: Average value across completed deposits
- Total Deposits: Count of all deposits with a completed-vs-pending breakdown
- Status badge: Pending or Completed
- Date and time of the deposit
- Source label:
Custom $X, a preset package (e.g.,$100 Package), orAuto Top-Up - Payment provider: Stripe (card) or CopperX (stables)
- Amount in USD and the credits awarded
- Receipt button on completed deposits for downloading the invoice
Use the deposit history for:
- Payment verification
- Expense tracking
- Receipt downloads for accounting records
Auto top-up
Auto top-up prevents unexpected instance termination by automatically recharging your account when credits run low.
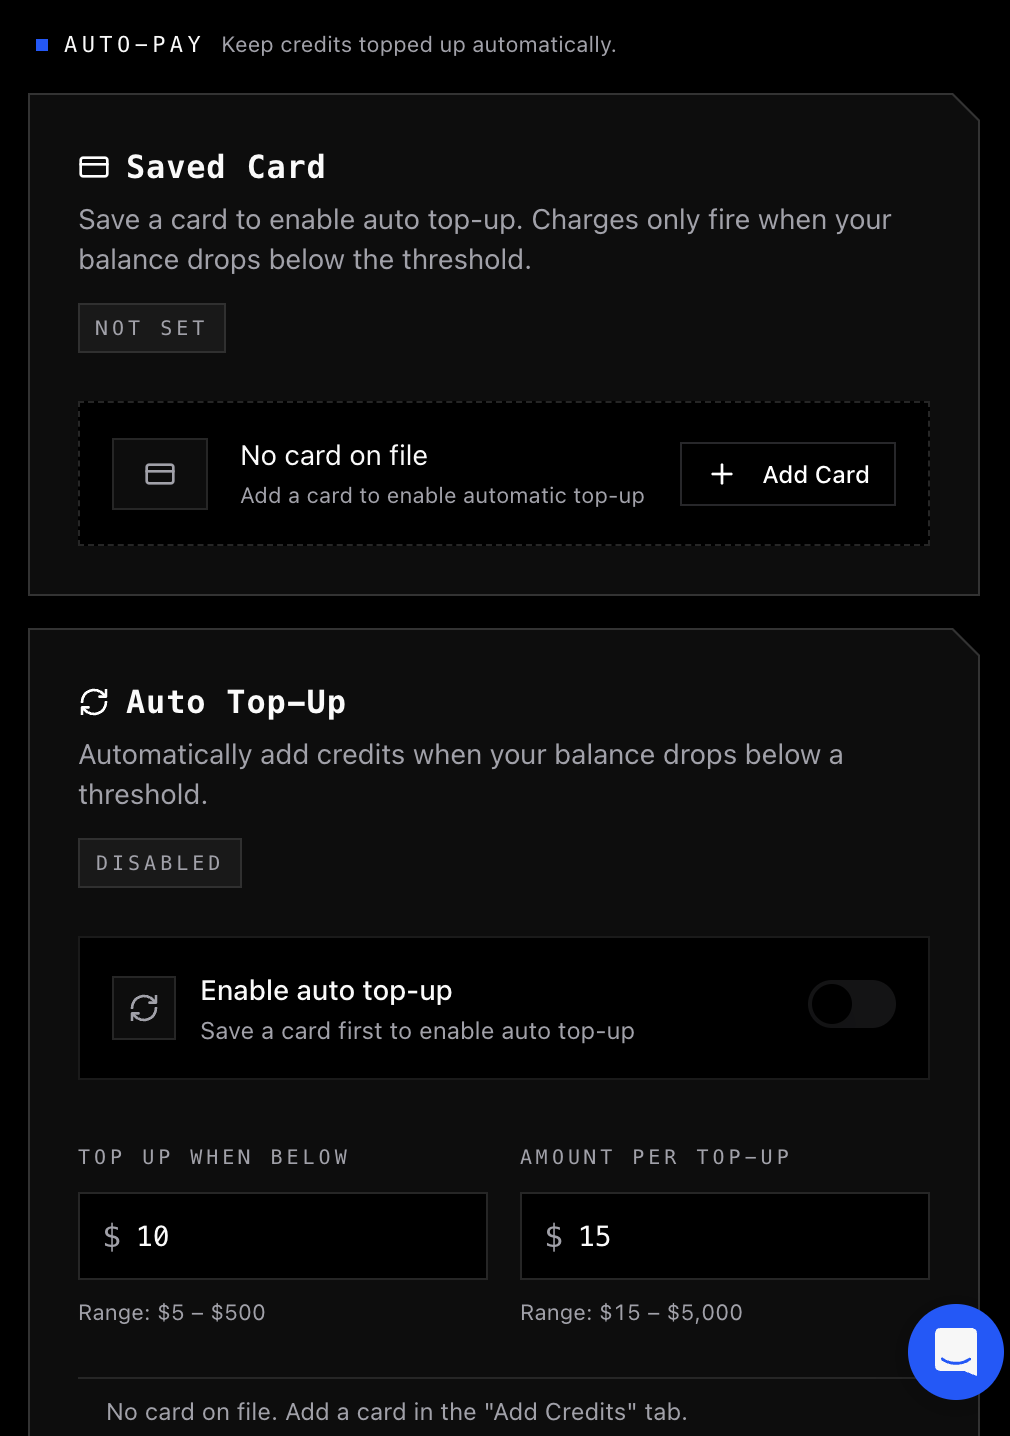
- Add a payment card from the Add Credits tab. Once saved, it appears in the Saved Card panel under Auto-Pay.
- Set Top up when below between $5 and $500 (for example, $10)
- Set Amount per top-up between $15 and $5,000 (for example, $50)
- Toggle Enable auto top-up on
- When your balance falls below the threshold, the platform charges your saved card for the top-up amount.
- A 5-minute cooldown between charges prevents duplicate billing.
- If a charge fails, the platform disables auto top-up and emails you a notification.
- Auto top-up charges appear in Deposit History labeled "Auto Top-Up".
For long training runs, auto top-up prevents instance termination due to insufficient credits mid-job.
Billing details
Add your company name, registered address, and tax ID to your account so they appear on every future card-payment invoice automatically. Stripe stores this information once and applies it to all subsequent charges.

- Issuing invoices with proper legal entity information for accounting and procurement
- Tax compliance: VAT, GST, EIN, or other regional tax identifiers
- Expense reimbursement and audit trails that require the registered business name and address
Configure billing details
Open the Billing page
In the Spheron dashboard, navigate to Billing. Scroll to the Billing Details card (step 03 in the billing settings).
Open the Stripe billing portal
Click Manage on Stripe. Stripe hosts the form and stores the data on its own systems; Spheron does not store company billing details directly.
Enter your business information
Fill in the four fields:
| Field | Description |
|---|---|
| Company | Legal entity name shown on the invoice |
| Address | Registered business address |
| Tax ID | VAT, GST, EIN, or other applicable tax identifier |
| Invoices | Email address that receives each invoice |
Save the changes
Save in Stripe. The portal links these details to your Spheron customer record. Every subsequent card-payment invoice includes the company name, address, tax ID, and is sent to the configured invoice email automatically.
Update or remove details
Click Manage on Stripe at any time to change company information, update the address, swap the tax ID, or change the invoice email. Updates apply to future invoices only; previously issued invoices are not retroactively modified.
Access past invoices
Stripe emails each invoice to the configured invoice email address. Past invoices are also available in the Stripe billing portal via the same Manage on Stripe button.
Team discounts
Volume-based and admin-assigned discounts apply automatically. The discounted price appears directly in the GPU listings on the dashboard when your team has an active discount.
- The higher of volume-based or admin-assigned discounts is applied automatically
- No action is required; discounts apply as long as you are authenticated
To inquire about discount eligibility for high-volume usage, contact support via Discord or email.
Best practices
Credit management:- Start with $50-$100 to understand usage patterns
- Monitor balance regularly for long-running instances
- Enable Auto Top-Up to avoid unexpected terminations
- Set up billing alerts in User Settings
- Use custom amounts for precise budgeting
- Review usage analytics to identify expensive deployments
- Terminate unused instances promptly
- Use Reserved GPUs for long-term workloads (30-50% savings)
- See Cost Optimization for GPU tier selection and Spot strategies
- Card payments are Stripe-encrypted and PCI compliant
- Stables payments are settled on-chain via CopperX
- Card data is never stored on Spheron servers
Frequently asked questions
Q: What happens if I run out of credits?
A: Instances terminate automatically to prevent overcharges. Add credits to resume.
Q: Do credits expire?
A: No. Credits never expire and remain available indefinitely.
Q: Can team members share credits?
A: Yes. Credits are shared across all team members.
Q: How quickly are credits delivered?
A: Instantly upon payment confirmation, for both card and stables payments.
Q: What are the deposit limits?
A: Minimum: $15 per deposit. Maximum: $5,000 per deposit.
Q: Are there hidden fees?
A: No. 1 credit = $1 USD of GPU usage. No additional fees.
Q: Can I get a refund?
A: Credits do not expire, so they retain value. Contact support for specific refund inquiries.
What's next
- Getting Started: Deploy your first instance
- Reserved GPUs: Long-term GPU reservations
- User Settings: Configure billing alerts
- Cost Optimization: Reduce GPU spend
- API Reference: Programmatic billing access